
How To Roll A Joint
Creating the perfect joint starts with understanding the basics of rolling. Doing it yourself lets you customise the size, amount and tightness of the pack to suit your preference. It’s also an affordable alternative to pre-rolled choices.
To help you roll a joint, we’ve put together some pro tips. Here’s how to get started.
WHY LEARN HOW TO ROLL A JOINT?
Rolling your own joints gives you control over how much material you use and how it burns. It can also be a cheaper option compared to buying pre-rolled choices from a pharmacy. Having this skill can also be helpful when pre-rolled joints are not available.
For beginners, it’s a chance to experiment with different techniques and find a style that suits their personal preferences. With a few joint tips and some practice, even first-timers can create smooth-smoking joints.
HOW TO PREPARE FOR ROLLING A JOINT
To roll the perfect joint, you’ll need a few basic tools to make the process easier. Start with a rolling tray to keep your materials organised and your workspace tidy.
Use a grinder to break down your nugs into fine, even pieces. If you’re using concentrates, prepare them ahead of time so they’re ready to add after the material is spread on your rolling paper.
Next, lay your rolling papers on a flat surface like a table or tray to make handling easier. Add a crutch as a filter to provide structure and improve airflow. Keep a tamping tool or chopstick handy for packing the joint evenly.
An ashtray is also useful for keeping waste in one place and maintaining a clean workspace. By having all your tools like your grinder, papers and filters within reach, you’ll save time and make the rolling process smoother overall.
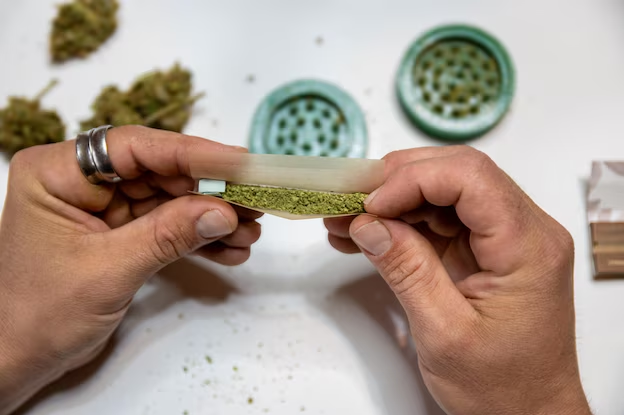
STEP-BY-STEP GUIDE TO ROLLING A JOINT
Knowing how to roll a joint lets you customise it to suit your preferences. By following the right steps, you can avoid issues like uneven burning or spilling and roll a joint that is evenly packed and burns smoothly.
Here’s a simple step-by-step guide from our experts to show you how it’s done:
Grind your material evenly for easier rolling:
Use a grinder to break it down into a fine, even texture. A good grind makes it easier to roll and helps it burn steadily.
Fold your filter into an accordion shape for structure:
Folding the filter this way creates a sturdy base, which makes it easier to roll and stop any loose bits from falling through.
Spread the material evenly across the paper:
Distribute the ground material evenly along the rolling paper, leaving a little space near the open end to make rolling easier and avoid spills.
Tuck the paper under for a firm roll:
Gently tuck the edge of the paper under the material and roll it tightly with your fingers. This keeps the joint secure while still allowing airflow.
Shape into a cone for an even burn:
Twist the top gently to hold everything in place. The cone shape helps it burn steadily without wasting material.
HOW TO GRIND YOUR HERBS PROPERLY
To grind your herbs properly, we recommend using a reliable grinder, such as a metal or plastic option. Metal grinders are known for their durability and precision, while plastic grinders are lightweight and easy to use.
Place your nugs between the teeth of the grinder, avoiding the centre if it has a magnetic closure. Twist the top gently a few times until the material breaks down into fine ground flower, which helps it burn evenly.
Working on a rolling tray can help keep your workspace clean and catch any material that spills during grinding. If you notice larger pieces left over, give the grinder another twist for a consistent texture.
HOW TO CHOOSE THE RIGHT ROLLING PAPER
Choose the right rolling paper by focusing on material, size and your personal preference. Each type offers unique benefits, so finding the right fit might take some trial and error.
Keep these tips in mind when deciding on the best rolling paper for you:
- Use hemp papers for durability: They’re a great option for beginners because they are easy to work with and hold up well during rolling.
- Try rice papers for a slow and even burn: These papers provide a clean burn, which is ideal for those who want less ash.
- Pick king-size papers for larger rolls: Their extra length allows you to pack more material, which makes them suitable for sharing.
- Match the paper to your rolling style: Select a paper that fits how you like to roll and your preferred method of use.
HOW TO FILL YOUR ROLLING PAPER
Fill your rolling paper properly by placing it on a flat surface to keep it steady during the rolling process. Next, spread your ground material evenly across the length of the paper, adjusting the amount based on your preferred size. If you want a cone shape, add slightly more material near one end to create the tapered design.
Leave a small space at the end of the paper for sealing. Use your fingers or a tamping tool to pack the material lightly and evenly. This helps prevent gaps and offers an even burn.
HOW TO ADD A FILTER TO YOUR JOINT
You can add a filter to your joint by using a filter tip to create structure and improve airflow. Start by rolling a small piece of semi-thick paper, like a business card, into a tight cylindrical shape or fold it into an accordion pattern. Place the filter at one end of the rolling paper before adding your material, keeping it firmly in place.
A filter tip keeps your joint stable, prevents loose bits from escaping and provides a more comfortable grip. It also helps maintain smooth airflow, making the overall experience better.
WHAT ARE THE DIFFERENT TYPES OF JOINTS?
Joints come in a variety of styles, each offering its own way to customise the experience. Knowing the options can help you pick one that suits you best.
These are some popular types of joints:
- Pinner: A slim, tightly rolled joint that burns quickly because of its small size. It’s perfect for quick sessions or for when you’re working with a smaller amount of material.
- Spliff: A mix of herbs and tobacco, spliffs burn slowly and offer a lighter flavour. They’re a good choice for those who want a longer smoking session.
- Cone: With a tapered design towards the end of the joint, cones are simple to roll and provide an even burn. They’re a popular choice for both beginners and experienced rollers.
- Cross joint: This unique type combines two joints that intersect, which allows it to burn in multiple directions. It is more advanced to roll and is usually made for fun or special occasions.
- Blunt: Rolled with thicker wraps, blunts burn more slowly and offer a larger size compared to typical joints. They’re ideal for group sharing or longer sessions.
DIY JOINTS VS. PRE-ROLLED
DIY joints let you customise the size, amount and style to suit what works best for you. A rolling machine can make it quicker and more consistent, and trimming excess paper helps create a smooth, even burn.
Pre-rolled joints are great if you’re short on time or missing the tools to roll your own. They’re ready to use and ideal for those who want a quick and hassle-free option.
Some people prefer to roll their own, while others like the simplicity of pre-rolled joints or opt for alternatives like edibles. It depends on what suits your situation and preferences.
To make rolling your joint easier, we have a wide range of smoking accessories and tools. From grinders and rolling papers to trays and filters, you’ll find everything you need. Check out our FAQ page or read our blog posts for pro tips on getting started with joint rolling and choosing the right tools.